Shotgun Forum banner
  • Whether you're a greenhorn or a seasoned veteran, your collection's next piece is at Bass Pro Shops. Shop Now.

    Advertisement

Wheelybird 1.0 Remote

8.3K views 60 replies 8 participants last post by  sledman8002002  
#1 ·
I have an older Wheelybird, I'm guessing/estimating it at approx 10 years. I've been digging for info on adding the remote option Champion offers to it, but cant confirm one way or the other if it's a go or no go.
Can anyone confirm? My original 25' cord is a 2 wire, can anyone tell me if the remote receiver that plugs in is also a 2 wire?

I did modify my cord right off the bat by adding another 25' (50' total now) by cutting the cord from the foot pedal and adding/using 2 prong quick connect 12v plugs. This works just fine, but there is that long cord to deal with. (As a plus I also put a 2 prong plug on from an old horn button that I can use rather than the foot release when desired).
If the remote receiver is also using a typical 12v 2 wire I dont think I'll have an issue. I'd just like to be sure beforehand as the unit package is north of $100 up this way.
If anyone can confirm, I'd appreciate it.
Here is the remote link...
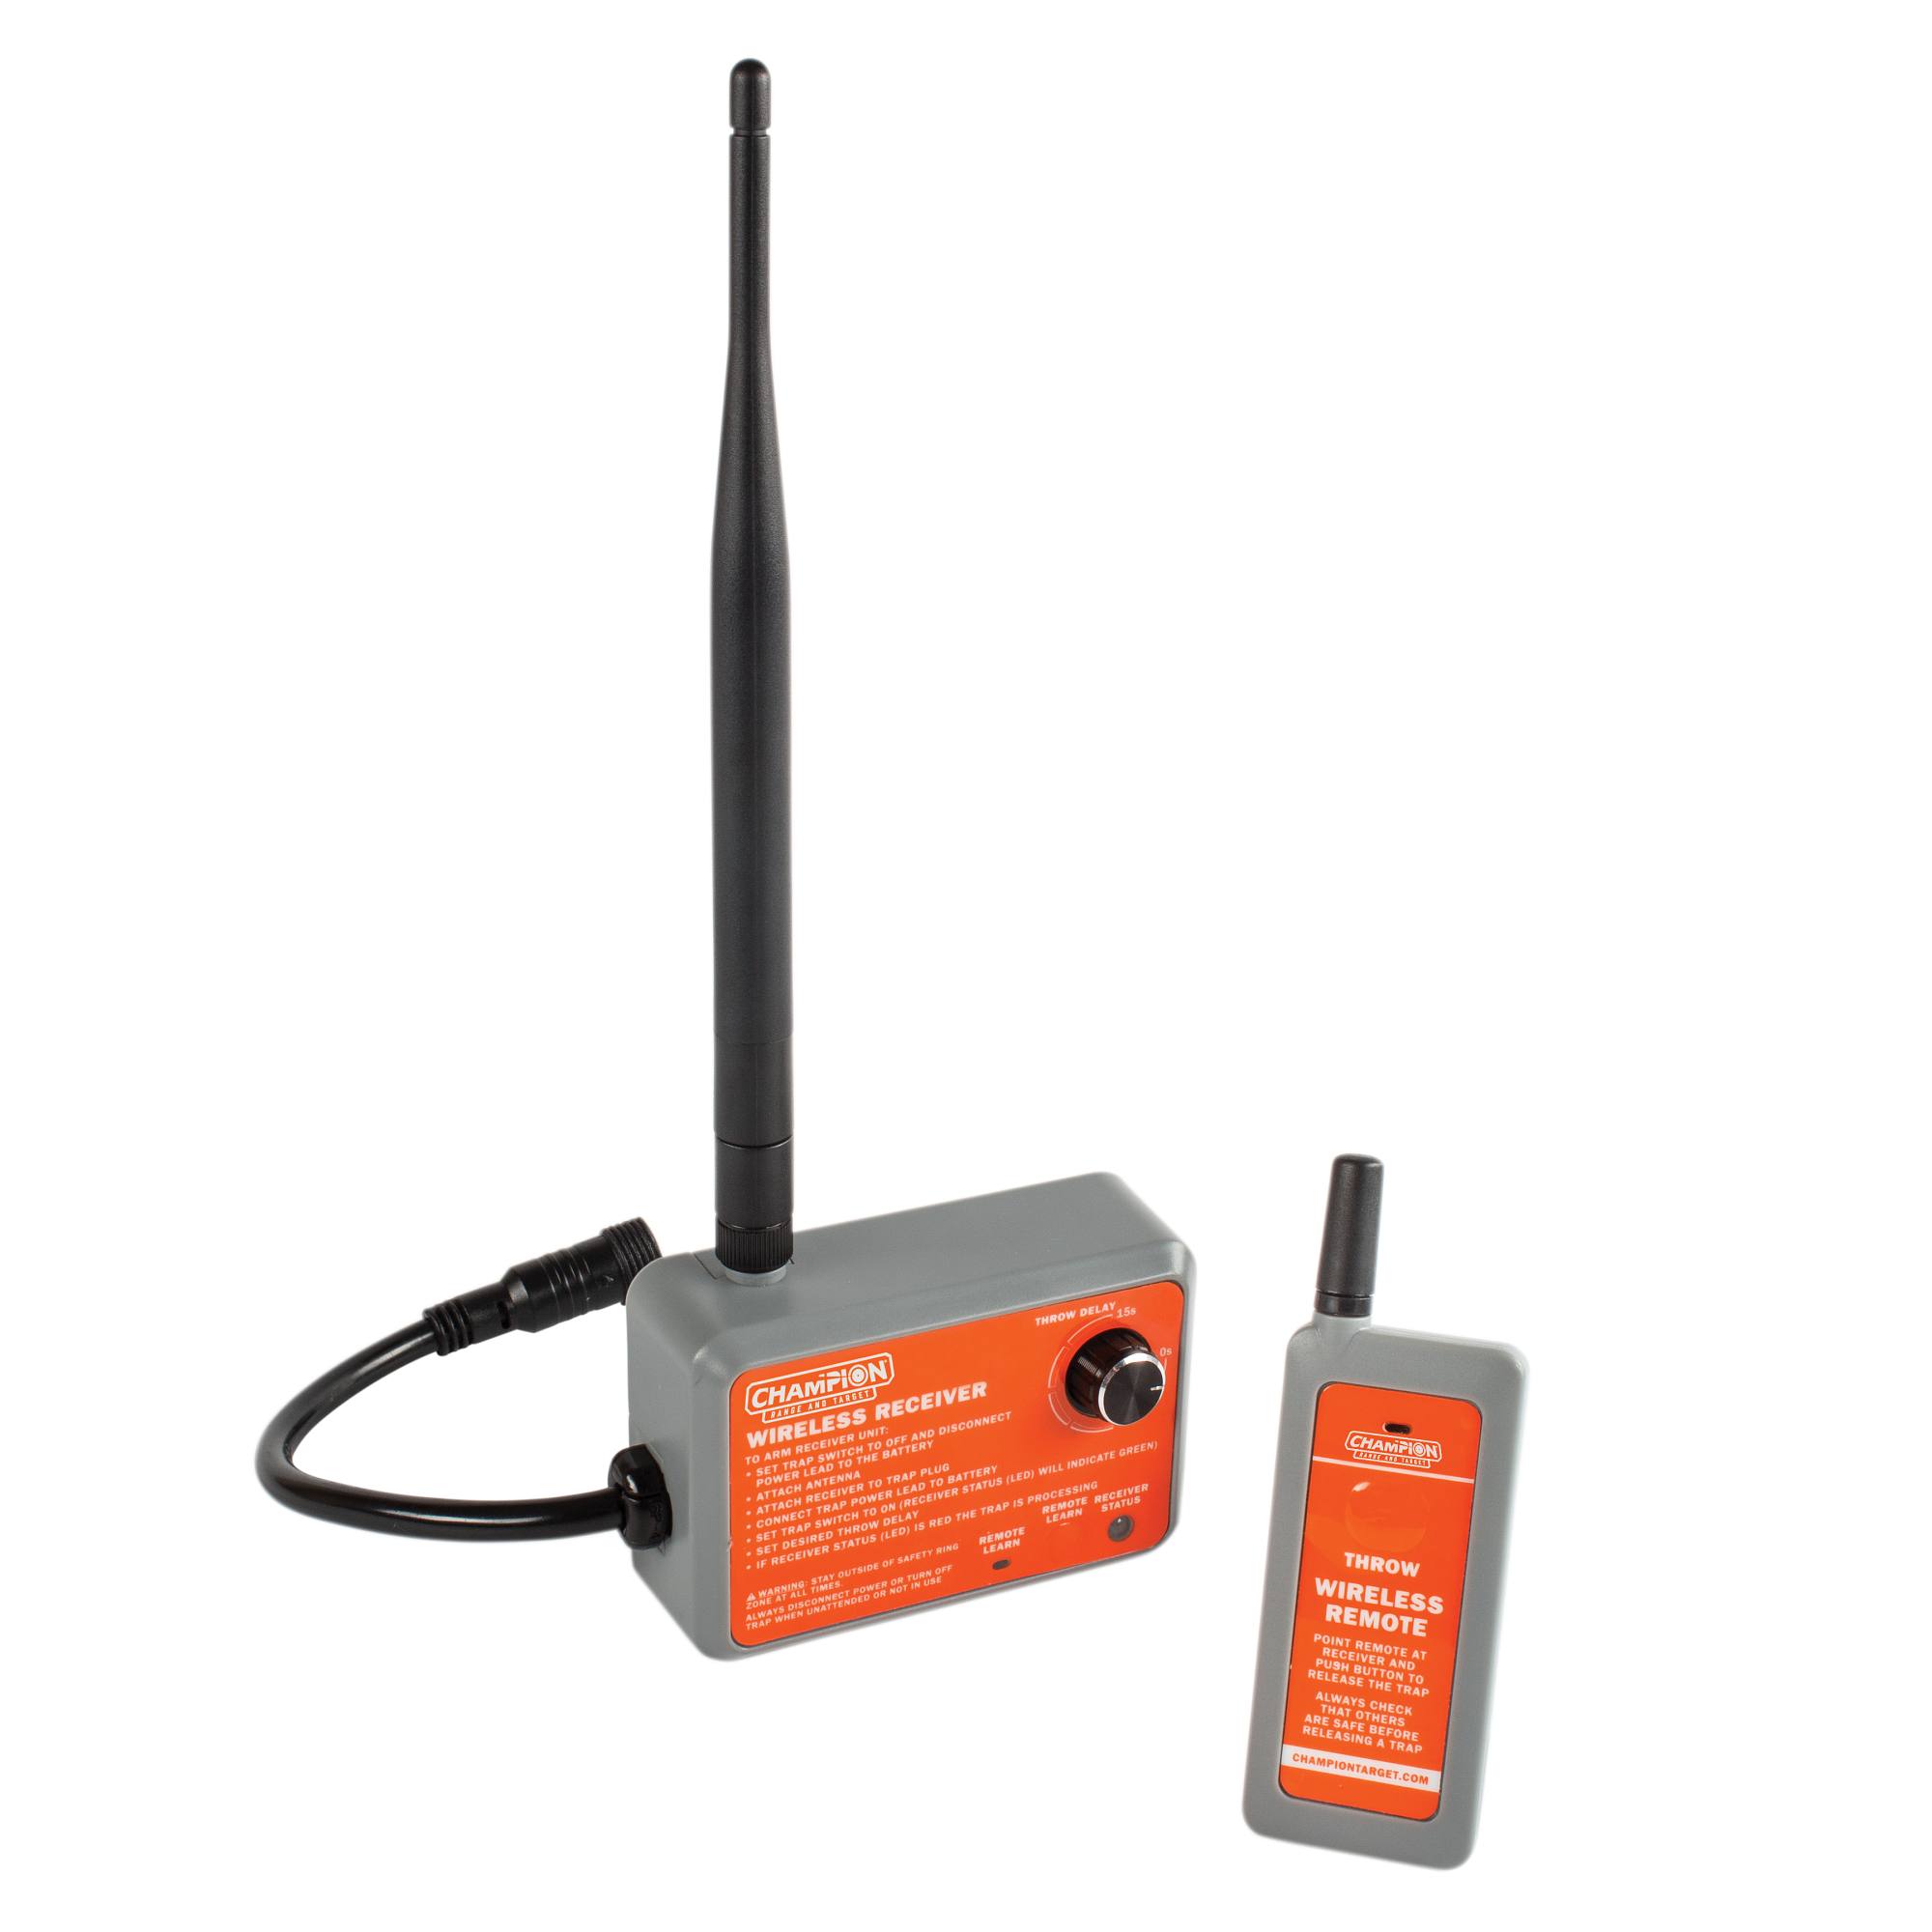
A couple pics of the setup I'm running. Not long after I got it I made an oscillating base for it as well, works good. At the same time I also put a 12v adjustable switch to it to control the swivel speed and also an adjustable tie-rod bar to set how just far the unit will rotate one way or the other. As you can tell I built a whole new frame at the time, it's weathered but like said, works good.
Now if I could add the remote...Thanks in advance!

Image

Image
 
#3 ·

Read this discussion.
 
#4 ·
I bought mine a couple of years ago from Midway for my Champion Workhorse. I believe that the plug is a round three-pin. The description for the item on the Midway site states "Fits Workhorse, 2017 and newer WheelyBird Traps". However, there are user comments that state that it can be adapted for the older versions. Mine works really well, especially with the adjustable delay feature. Midway is currently selling it for $65.00. Hope this helps.
 
#7 ·
Fantastic replies everyone, thanks much!!
I believe that the plug is a round three-pin.
3 prong, it figures. I appreciate the link dbh and that pic Javy. As you know, mines a 2 wire, but thanks to the descriptions and pics I now have a pretty good idea on the how.
Champions website wont accept an email from me for some reason, seems to be our postal code is an issue. I tried that part number in a search with no joy.

Rather than trying to get ahold of the 2.0 plug, I can make something up from a trailer wire harness plug. I think.
Suppose I left the original 2 wires in place on the buss and ran my own green/yellow wire to join what looks to be the white wire on the buss? Cut my 2 original wires to length matching the new green/yellow and adding a plug to the 3. Snip the round 3 prong off the remote receiver and add a matching (trailer) plug to the fresh one.
Make sense?
Going from your pic dbh, the remote's blue and brn are simply pos & neg, yes?
 
#9 ·
You can get aftermarket remote car door lock controller. That plus a simple 12 volt relay. Pretty simple. I have one on my Atlas AT 50. Works really well.
I like the price! Even up here I can get it for 20 and change. All those wires tho, how many of those would be used? I'm assuming just 3 as well? Pos/Neg and then use a test light to find a trigger wire?
 
#10 · (Edited)
I don’t think the two wires that go to the foot pedal are positive/negative. I think they just complete a circuit. The third wire connects to one side of the circuit breaker to get your 12v. There are lots of ways to do it I’m sure but when you bypass that circuit breaker I’m not sure that’s a great idea? I like the $10 way I did it. Try their 1-800 number. (800) 533-5000 - Option 3
 
#11 ·
Sledman,
Yes, you just need to test which button runs which wire. At least I believe thats how I did it? They may have a schematic? I got a cheap Pelican type box from Wally World to put all the stuff in.
I used a similar system to convert manual bird launcher traps to electric. Just had to manufacture a way to have a door lock actuator work the release. Worked good.Range wasn't enough for the remote bird release but it's enough for a trap thrower.
Nice to have two separate controllers for releasing clays. Can have a friend pull for you and vice versa without having to pass the remote around.
 
#14 ·
I bought a new one and the cord has a pigtail that you can unplug and attach the remote in place of it. Acording to the rep from Champion that I spoke with if it's a solid connection (no pigtail) then a remote won't work. Doesn't mean you can't make your own like an earlier post stated but this is what the manufacturer stated. Hope this helps and good luck.
DG
 
#15 ·
Here is an answer from a product Q&A that may be useful: "If yours is an older model then it can be adapted, but requires electrical connections inside the control switching. I did one for a friend and it works well. The foot pedal is a switch that closes in the batt neg (-) circuit and cycles the thrower. The remote requires an additional + connection to power up the remote receiver. I had to replace the installed 3 pin connector provided with the remote unit, as i couldnt find one to match it."
 
#17 ·
OK, I understand now that the switch closes the circuit. (I'm no electrical guru so I appreciate the descriptions/comments).
More searching revealed this older link from member v35...
I see there's been a few that have had success with the Do-All remote on the Champion 1.0 as well.
I just need to decide which of the 3 remote systems I'll try first.
 
#19 ·
Yes, you will have to get a relay. Amazon or NAPA (auto parts store) or an electronics store should be able to get you set up. Should be cheap.
Yes the schematic looks right.
Seeing the "learning " button on the schematic makes me think you could get a second receiver unit and program it to the second button the fob and control two machines from one FOB????? Or perhaps more with the correct door lock system. Mine has 4 buttons??

What motor did you use for your random add on????
 
#20 ·
OK, I have a coupla relays in my shop I use for 12v accessories on ATV's, boats and vehicles. I understand their usefulness, I just dont get the jist of it in this case? Not yet anyway.
Just for the halibut I ordered a cheap $20 model yesterday, I'll have to experiment with the 1 thru 6 wires to see which will send the signal fire the thrower arm. Perhaps any one of those 6 wires will do it?

@dbh1956, (hope its OK), I'm borrowing one of your well defined pics. Once I find the wire which sends the signal I want, it seems logical to me to put that found signal wire in place with the white instead of the green/yellow as pictured & circled. Yes or no? (I do realise the green/yellow, blue & brown are from the Champs remote receiver)

Image
 
#21 ·
What motor did you use for your random add on????
For the oscillator I used a 12v motor from an RV. I was planning on using an old wiper motor from the wrecking yard but had this handed to me by a close friend. I was told it is whats used to run/move a slide out room on a TT. I dunno for sure, but its got plenty of oomph, was free and works great.

For the switch, I'm using a SPST on/off for power along with an old school 12v auto fan dial switch that has 3 settings, (low/med/high) that controls the motor/swivel speed. Without the fan switch the thrower swivels a tad too fast on just 12v power alone. At high speed it would sometimes interfere with the clay dropping properly on the arm, resulting in a broken clay upon release. I usually run it on the medium setting, but sometimes slowest with new shooters.

The thrower is sitting on a swivel base from an old fishing boat chair.

I had to zoom in so pic is a bit blurry, back when first built approx 10 years ago, everything still nice and shiney. Power on/off switch is next to Champ decal on the thrower. The speed dial switch is out of the frame up near the battery location. I should also say, I use a self re-setting 15 or 20 amp breaker instead of a typical fuse on the power wire, but it has yet to pop anyway.
It doesnt show it, but I made a couple of extra holes in the swivel arm to adjust/lesson the degree of back and forth movement. Some of the areas I've used it just doesnt allow the field of fire for a full width swivel.

Image
 
#24 ·
So the remote lock kit came in this afternoon. I finished up what I was doing and tore into it to see whats what.

I seperated the wires and hooked the black and red to a battery, then proceeded to see what I could find for power going out from clicking a fob button. The brown wire shown throws the most voltage out, it would turn the light on with my tester and with a multi-meter the voltage would climb to 11 and change. My multi meter is not a high quality piece, its slow to register volts as compared to some.

I got to thinking what you said earlier Goldensrule, about not needing to go inside the thrower. I tried hooking that brown to one and also both of the wires that use the foot trigger to release.
No go. The receiver clicks, power is there, but no release.
So perhaps those 2 thrower wires just need to close (as dbh mentioned), no extra power needed? I did a continuity check on the foot release when stepped on and it does.
Should the remotes receiver brown power wire then go inside the unit to attach to the white wire as circled in post 20?

OR...am I completely off base and should be looking at using a different colored wire(s)?

Image
 
#25 ·
Well after frigging with it for far too long I'm giving up on this remote. I came in to order the Champion model this afternoon, price had dropped from $140 to $107 (Amazon), so I'll take that as a good sign.
Gave it a good go-over. The frame I had built/upgraded is really starting to weather. Come winter I'll pull the thrower & oscillator off, clean it up and repaint, maybe add a better wheel kit while I'm at it.

Anyone know of a Champion parts page link for the 1.0 or 2.0? I havent found anything in that regard, I'd like to possibly order that 55005 3 wire pigtail.
I see their new Wheelybird 3.0 has a 60 clay stack now. Back when I had access to a machine shop I often thought about making an extender kit for an extra 10 or 15 birds.
 
#27 · (Edited)
If they're still using a half inch axle then I would say yes. Measure your axle shaft to be sure, measure the off-set as well then look into the aftermarket. I'm reasonably sure my original wheels are 6 inch, I think I'm going to an 8 with bearings.

Edit to add...I got to thinking back, my original grey plastic wheels may have only been 5 inch diameter?? I switched them out right off the bat as well, to a pair of steel rim from a lawn mower. I just the other day put another set on I found from another lawn mower, they're plastic rimmed but a tad taller and wider. Makes it easier to mover around.